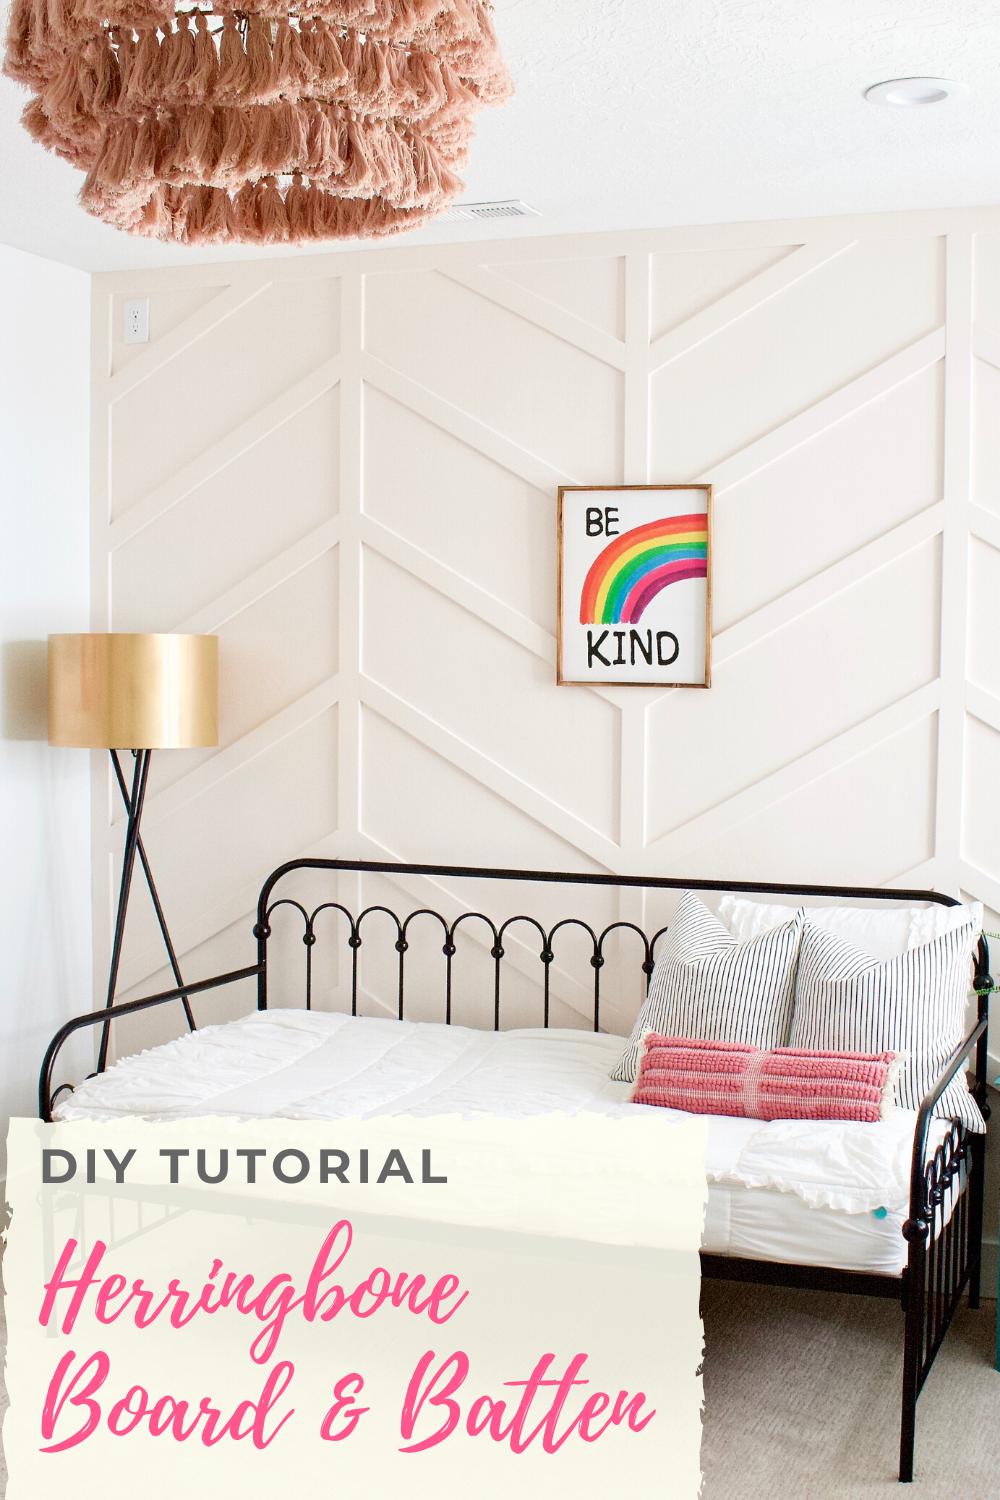


If I would have known how easy and quick it would be to turn a boring wall into a beautiful focal point with herringbone board and batten, I would have started when we were originally finishing the basement. In just a day and a half I was able to transform my daughters space for $40 in lumber! Thats it! And if shiplap is more your style here’s how I shiplapped my kitchen island for $55


Here’s how I did it.

Herringbone Board and Batten Supply List:
Materials Needed:
click on materials for links to products. By purchasing through these links I will make an affiliate commission.
- x13 1/2″ x 2.5″ x 8′ Primed MDF
- White Caulk
- Caulk Gun (if you are a beginner and don’t already own one go for the dripless. It’s worth the extra $2)
- Finishing Nail Gun with 18 gauge finishing nails. *this is the one I have and love because its cordless and quiet! but there are plenty of inexpensive (I’m talking $30-40 finishing nail guns (here’s the old one I used to use: $28 on Amazon) you can buy in store or online, but most of them will need an air compressor).
- DryDex Spackling (don’t forget the spatula to spread it).
- Tack Cloth
- Sanding Block Medium
- Scotchblue Pre-tape with attached plastic
- 1 1/2″ 18 gauge brad nails
- A gallon of paint your preferred color, and painting tools or a paint sprayer.
Additional Tools needed:
- Miter Saw
- Table Saw (optional)
- Hammer
- Brad Finish Nail Gun
- Flathead Screw Driver

Frame The Room:
- Take 1 full length board and place it snug in the left top corner of your wall. Install board with finishing nailer. (for added support you can add liquid nails to the back of each trim piece).
2. Measure the distance from the end of that board to the right side of the wall and cut a piece to fit this space. Mine was 30 1/4”. Install it snug to the ceiling like the first piece.

Install Vertical Pieces:
3. Measure the entire length of the wall and divide it in half. My wall is 125 inches so my center point was 62.5 inches. This center point should be where the middle of your first vertical board should hit. Trim down the vertical board so it fits snug between your baseboard and the ceiling piece you installed in step 1.
4. Measure the distance between the middle board and the left side of your wall. This should be the middle point for your next vertical board. (repeat on the right side until all of your vertical boards are installed).

my favorite nail gun linked here.
Angled Cuts to Create the Herringbone Board and Batten Pattern:
5. Take a new board and cut a 30 degree angle at one end of it. Hold the board flush to one of your vertical boards and mark where it hits the next vertical board. Cut and dry fit this board to make sure it hits both ends snug. (My boards are 33 1/4”.)
6. Create your template spacer board: Decide how far apart you want your angled pieces to be. I chose for mine to be 12 inches apart. I cut a 30 degree angle on both ends.

7. Depending on how accurate you were with spacing your vertical boards, you should be able to take the board from step 5 and use it as a template to make all the boards the same exact size. For the boards where the angle is backwards simply take the first template board and flip it over (so the shiny showing sides are touching).
8. When you get to the top place your 30 degree angle where it should be and draw a line where the board hits the ceiling and cut there (it won’t be a 30 degree angle).


Prepping and Painting
9. Fill all the seams and nail holes with Drydex spackling or plastic wood filler. Either one is a good product to use on trim. It’s important to note that anything you want to be smooth and look like there isn’t a seam should have spackling. Spackling sands beautifully with a hand sander.
Caulk
The gap between the sides of trim and wall needs to filled with caulk. The best way to caulk is to make sure the tip of your caulk gun has a LITTLE hole. Run a bead of caulk and then take your finger and push it in, then take a wet wipe or baby wipe and rub off any and all excess. Remember theres no sanding down caulk so once it dries its there!
Paint
10. Once all the sanding and caulking is complete take a vacuum to collect the large pools of saw dust. Next take a tack cloth and wipe down every nook and cranny. I did a really good job of wiping down everything that my arms could reach and then as I started painting I noticed pools of sawdust on some of the upper boards. To make your paint look good you have to take the time to prep prep prep!

11. If you haven’t tried this Scotchblue tape with plastic attached YOU HAVE TO TRY IT! It’s seriously life changing if you are planning to paint spray a wall. I have BRAND NEW carpet and this rolled out 4 feet (and if course my OCD made me also put some drop cloths under neath just in case) and my carpet is completely clean. For more paint tips see my 5 tips for using a paint sprayer.

Step 12: Paint and admire your masterpiece.
And there you have it! Be sure to follow along with more projects on IG @honeybuilthome


If I would have known how easy and quick it would be to turn a boring wall into a beautiful focal point with herringbone board and batten, I would have started when we were originally finishing the basement. In just a day and a half I was able to transform my daughters space for $40 in lumber! Thats it! And if shiplap is more your style here’s how I shiplapped my kitchen island for $55
Here’s how I did it.
Herringbone Board and Batten Supply List:
Materials Needed:
click on materials for links to products. By purchasing through these links I will make an affiliate commission.
- x13 1/2″ x 2.5″ x 8′ Primed MDF
- White Caulk
- Caulk Gun (if you are a beginner and don’t already own one go for the dripless. It’s worth the extra $2)
- Finishing Nail Gun with 18 gauge finishing nails. *this is the one I have and love because its cordless and quiet! but there are plenty of inexpensive (I’m talking $30-40 finishing nail guns (here’s the old one I used to use: $28 on Amazon) you can buy in store or online, but most of them will need an air compressor).
- DryDex Spackling (don’t forget the spatula to spread it).
- Tack Cloth
- Sanding Block Medium
- Scotchblue Pre-tape with attached plastic
- 1 1/2″ 18 gauge brad nails
- A gallon of paint your preferred color, and painting tools or a paint sprayer.
Additional Tools needed:
- Miter Saw
- Table Saw (optional)
- Hammer
- Brad Finish Nail Gun
- Flathead Screw Driver
Frame The Room:
- Take 1 full length board and place it snug in the left top corner of your wall. Install board with finishing nailer. (for added support you can add liquid nails to the back of each trim piece).
2. Measure the distance from the end of that board to the right side of the wall and cut a piece to fit this space. Mine was 30 1/4”. Install it snug to the ceiling like the first piece.
Install Vertical Pieces:
3. Measure the entire length of the wall and divide it in half. My wall is 125 inches so my center point was 62.5 inches. This center point should be where the middle of your first vertical board should hit. Trim down the vertical board so it fits snug between your baseboard and the ceiling piece you installed in step 1.
4. Measure the distance between the middle board and the left side of your wall. This should be the middle point for your next vertical board. (repeat on the right side until all of your vertical boards are installed).
my favorite nail gun linked here.
Angled Cuts to Create the Herringbone Board and Batten Pattern:
5. Take a new board and cut a 30 degree angle at one end of it. Hold the board flush to one of your vertical boards and mark where it hits the next vertical board. Cut and dry fit this board to make sure it hits both ends snug. (My boards are 33 1/4”.)
6. Create your template spacer board: Decide how far apart you want your angled pieces to be. I chose for mine to be 12 inches apart. I cut a 30 degree angle on both ends.
7. Depending on how accurate you were with spacing your vertical boards, you should be able to take the board from step 5 and use it as a template to make all the boards the same exact size. For the boards where the angle is backwards simply take the first template board and flip it over (so the shiny showing sides are touching).
8. When you get to the top place your 30 degree angle where it should be and draw a line where the board hits the ceiling and cut there (it won’t be a 30 degree angle).
Prepping and Painting
9. Fill all the seams and nail holes with Drydex spackling or plastic wood filler. Either one is a good product to use on trim. It’s important to note that anything you want to be smooth and look like there isn’t a seam should have spackling. Spackling sands beautifully with a hand sander.
Caulk
The gap between the sides of trim and wall needs to filled with caulk. The best way to caulk is to make sure the tip of your caulk gun has a LITTLE hole. Run a bead of caulk and then take your finger and push it in, then take a wet wipe or baby wipe and rub off any and all excess. Remember theres no sanding down caulk so once it dries its there!
Paint
10. Once all the sanding and caulking is complete take a vacuum to collect the large pools of saw dust. Next take a tack cloth and wipe down every nook and cranny. I did a really good job of wiping down everything that my arms could reach and then as I started painting I noticed pools of sawdust on some of the upper boards. To make your paint look good you have to take the time to prep prep prep!
11. If you haven’t tried this Scotchblue tape with plastic attached YOU HAVE TO TRY IT! It’s seriously life changing if you are planning to paint spray a wall. I have BRAND NEW carpet and this rolled out 4 feet (and if course my OCD made me also put some drop cloths under neath just in case) and my carpet is completely clean. For more paint tips see my 5 tips for using a paint sprayer.
Step 12: Paint and admire your masterpiece.
And there you have it! Be sure to follow along with more projects on IG @honeybuilthome


+ show Comments
- Hide Comments
add a comment